

Welcome to my digital home! There are lots of articles you might find helpful buried in this site on topics such as modifying an Alfa Romeo 159, rebuilding a Lotus 7 (Robin Hood 2B), not to mention a ton of stuff on technology in general. It’s all here somewhere, so use the search function or navigate using the menu structure. if you want to talk, reach out via the contact function, I usually do answer!
Random Post Selection
Alfa 159I finally got round to installing the Wireless OBD II dongle I bought off ebay into my car the other day and thought I would document the process for those that may be interested.
First your going to need to pick one up. I bought a clone Kiwi Wifi dongle off ebay for £45 which is a third of the cost of an original branded version so a complete bargain! Its a great little unit and perfect for interfacing with any OBD application you may want it for. Once you get the unit delivered you will notice that it is a simple plug and play job with no configuration. While this is true in its simplest form, one slight issue I found is that the OBD port is always powered up, therefore you would have to plug it in and remove it when you were not using it or it would always be broadcasting direct access to your cars ECU via a wireless network, which in my book is not the best of ideas!
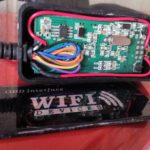
So the first job you have is to retro-fit an on off switch to allow for a more permanent installation! Its an easy job and Maplin have micro 12v switches that will fit and do the job well for a few pence. Just slide your fingernails around the edge of the front plastic cover and it will literally pop off in your hands, giving you access to the internals. All you need to do is de-solder the power connection (trace pin 16 on the connector), add a new bit of wire from the board to your switch and back to the original wire where you can splice it back together. To do this nicely you need about 12cm of wire, 2cm of heat shrink wrap, a soldering iron & solder & a small switch.
Fit the switch on the side of the unit for easy access and put the cover back on with a dab of glue to hold it in place.
Here is an image of my modified unit.
Once the unit is installed in the car, you can connect it to your chosen application which for me was Rev2 from Dev Toaster on the iphone. This app is a bit pricey at £26 for the pro version, but gives me everything I want in terms of access to key metrics in real time, full data logging and even engine code interrogation and resetting! It can get data on a large number of points including:
Vehicle Speed
RPM
Fuel Consumption
Engine Coolant Temp
Fuel Pressure
Calculated Engine Load
Throttle Position
Intake Manifold Pressure
Air Intake Temp
Timing Advance
Mass Air Flow
Fuel Level
Barometric Pressure
EVAP System Vapor Pressure
Fuel Trim
Boost
Examples:
In terms of the actual connection between the iphone and the OBD II dongle, its as simple as:
Connect the OBD II and power on
Go to settings > WiFi on the iPhone
Press the arrow next to “CLKDevices” network
Set a static IP of192.168.0.11 & netmask of 255.255.255.0, save and exit
Open Rev2, go to settings, hardware choose Kiwi Wifi, then select custom from the bottom
Set the device to 192.168.0.10 and port of 35000
Done.
From this point your up and running!
You do need to configure a profile for your car, with its kerb weight as this is used to calculate torque and BHP. My kerb weight is documented at 1680KG, but I have the top spec TI version with all the extra trimmings so expect it to be closer to 1750KG. I am of course excluding the 75KGs of lard I personally add to the equation, but I think thats fair! I will actually get it weighed at some point just to be pedantic, but for now 1750kg’s is close enough for me.
http://www.youtube.com/watch?v=NWvbQ1RdHCoRelated Images: [...]

General…..after a day clearing out the garage (trust me, it needed doing), I came across the original install CD for my Stanton Final Scratch V1, which I thought was long gone. After further search through a lot of vinyl, I found the control records, which meant all that was left was to dig out the interface and hook it all up. After about 4 hours of kicking an old Compaq Laptop into shape, I had a working version of FinalScratch V1.1 up and running with a bunch of MP3’s ready to go……..
All of this equates to one simple thing, new mixes are on the way!
I had been waiting for a suitable opportunity to purchase the new Traktorscratch V3 setup, but to be honest, this works just as well. Sure, its a little clunky, very basic and quite slow, but once you get to grips with its idiosyncratic nature, it is actually quite usable.
Of course, now I have the basics back up and running, and can start to churn out some fresh mixes, which is what its all about.
Stay tuned
Pure Retro Sheek, Traktor FS V1.1 on an N800C!!!
Related Images: [...]
Generalok, I have had an X25 deck stand for years now, and it is actually quite good. Its stable and well put together, and of course, holds enough of the basic equipment to keep you up and running. Of course, as I expand my setup, I have come to basic realisation that what I need, is actually a simple flat surface. So me, being me, I opened up visio and knocked this up:
….essentially it is 2 sheets of 8ft x 4ft, 3/4″ mdf cut into a number of shapes and sizes, screwed togetehr resulting in two vertical podiums, each wide enough to take a 19″ rack mount perfectley, and a worksurface 2meters by 750mm, big enough for plenty of equipment. the whole thing stands 600mm high, which is the same height as your kitchen sink! so its ideal to stan infront of for long periods of time. If anyone is interested I’ll post up the 2 x cutting guides for the mdf sheets so that you can make your own. To put it into perspective. you can buy somthing similar, but inferior at www.htfr.com for well in excess of £130. The total cost for my version, which is bigger and better, is £30, yes 2 x sheets of mdf from B&Q at £15 per sheet. for the sake of an afternoons work, i know which one i would do!
Related Images: [...]
GeneralWell it has been a while since I treated myself so the other day I stopped by West End DJ on my way into the office and I picked up an Akai APC 40. In fairness it was my birthday and I used that as a feable form of excuse for the expenditure, but I have a semi clear conciense as a reslut and another oh so sexy toy to play with!
This toy really is the ultimate in Ableton Live control, extending the interface litterally to your fingertips and bringing a whole new world of possibility. You can read all about it on Akai’s site, but if you really want to see the potential, check out these YouTube links that just sum up the potential in full from my perspective:
Ok, so its going to take me a while before I get this good, but thats what its all about.
……watch this space 🙂
Related Images: [...]
GeneralWell, after the change of room size the RP6G2’s lack of low frequencies eventually pushed me to go the extra mile and get the KRK10s. Initial feedback on it? Its got so much bass! I know that’s the whole point of it, but wow, I like bass and even I struggle with this sometimes. So much so that I actually bought the Boss FS-5L latched foot switch so that I could bypass the sub from time to time and allow the full range of frequencies back to the RP6G2’s!!!!
So….. what does all this mean?
Well, first off the KRK10s is one hell of a good sub, well built, sounds great and can really pump out some power, so much so, it rattles all of the radiators in every room of the house when its wound up! that said, it more than matches the RP6G2’s and compliments them well. The unit itself acts as the hub of your system, so you route your main outs to the unit from your source, then plug each of the other 2 speakers into the sub. My preference for this was to use TRS Balanced Jacks from my mixer to the Sub, then XLRs from the Sub to each speaker. A good, cheap cable provider I use regularly is: Vision Sounds on eBay, they are quick to process, cheap to buy and decent quality, so that works for me!
The KRK10s comes with a built in Crossover, with a knob on the back to set the Crossover frequency. I have played with this for a while now, and for me, I find that the best option is to keep some of the bass going to the RP6G2’s and let the sub handle the low stuff. To that end, I tend to have my crossover point at around 50Hz, which lets the RP6G2’s handle the punch in a beat while the KRK10’s handles the roll. I find this approach keeps the imaging better in my opinion.
The built in amp comes with the same +-6db of gain through a control knob on the rear. Mine is set to -4db and that still, on some tracks and sources, overpowers the RP6G2’s at 0db gain! For this reason, I find that it is very useful to have an EQ of sorts in the mix so you can compensate for different sources. I make use of an Alesis MultiMix8:Firewire to bring each of my audio sources together, which gives me a low/med/high EQ on each channel (except the Firewire output, but that’ a whole different article!).
The final, but very useful feature that comes with this unit is a bypass ability. You can plug in any latch-able foot pedal, but the Rokit site recommends the Boss FS-5L. I have the FS-5L and agree with them, its well built, but not so hard a switch that you can’t use it by hand if you want it on your desk. The reason for the bypass is actually quite a good one. Sometimes, you need to remove the bass effect of the sub and revert back to just the bass of the RP6G2’s. To do this without a bypass and making use of an EQ, you would taint the bass feed to the RP6G2’s and actually not give an accurate image, however, the bypass, when engaged, simply kills the Sub, bypasses the EQ and outputs a full range signal to the RP6G2’s leaving you with a nifty way of getting an accurate frequency reproduction for those absolute moments of audio clarity!
If your seriously thinking of adding a KRK10s to your setup, here are some tit bits of advice for you:
Buy the Boss FS-5L Latched Foot switch at the same time to give you the ability to bypass the sub easily when needed
If possible put at least a basic 3 band EQ between your source and the entire setup, as the ability to gently retard the bass is very handy
Make sure you have no neighbours attached, above, below or to the side of you, or you will quickly make some new enemies!
All in all, I am genuinely blown away with my overall investment into the Rokit camp, and will happily pick up an ERGO when funds can justify the £500 price-tag!
KRK10s Specs:
225 Watt (peak) Powered Sub woofer for Studio Use
SPL: 110dB Music and 113dB Peak
10” High-Excursion Glass Aramid Composite Woofer
Frequency Response: 34Hz – 50Hz to 130Hz Variable (+/- 1.5 db)
Variable and Sweepable Low Pass Filter
80Hz High Pass Filter
Radically Curved Front Baffle Design for Amazing Performance
Front-firing port provides low frequency extension without boundary coupling
Bypass Control using Standard Foot switch
Related Images: [...]

InfoSecThe concept is simple, the more obstacles in the way the better. Let me abstract the concept for you…..
…..you put your file in a safe, I crack into the safe.
………you put your file in a safe, and lock the safe in a strong/secure room, I crack the room then the safe.
………..You put the file in the safe, in the room, at the bottom of the ocean, I go elsehere to get a different file!
People often talk to me about controls, and want to know which one is best. The answer typically is either all, none, or both. The more layers you have, the more security you have. But lest we foget the basics, understand the cost of the control vs the cost of the asset through a formal Risk Assessment Process.
Related Images: [...]
Alfa 159After the successful modification made to the gearbox cooling system https://jabawoki.com/2016/01/27/alfa-159-gearbox-cooler-modification/ I found that, while the cooling was perfect while the car was moving over 30mph, there was an issue at lower speed.
On more than one occasion I found that if I sat in traffic, slowly edging forwards towards a busy roundabout, once I got to the roundabout and accelerated away, I would have a shift flair for the first gear change. This would disappear by the second change so was clearly a cooling issue where the lack of airflow meant that the gearbox temps would rise in traffic until you had airflow again.
The fix is/was simple. I just needed a thermostatically controlled fan adding to the radiator so that I could generate airflow at low speeds.
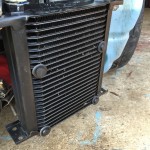
After doing some basic research I found a really nice 5″ fan from SPAL, available from Merlin Motorsport.
This unit was very high power and perfect for the job but I needed a thermostatic control solution as well. Merlin had the ideal solution as well, a Davis Craig Thermostatic Adjustable Fan Controller.
This fan controller was ideal as it had a separate external temp sensor that was fitted into the radiator itself which meant I did not have to cut into the oil lines to make the mod.
Fitting required removal of the bumper as usual, but that gave me an opportunity to fix a crack that was temporarily repaired previously.
Adding the fan was very easy as it came with its own mount kit that essentially used special plastic ties that passed through the fins of the radiator and clamped it securely to the rear of the unit.
Fitting the fan controller was a little more tricky but only due to the very short wire run on the temperature sender which meant it had to be within two feet of the fan. Fortunately it nestled perfectly between the ECU and the headlight!
The unit can control two fans but I am only using it in single mode. It has an adjustable temp trigger so mine is set to 75C which is a reasonable point to start testing from. The added digital temperature display is also quite useful for diagnostics!
I will have to see how it pans out but I am pretty confident that this will sort the last pesky shift flairs for good!
Related Images: [...]
InfoSecOpen post to see coverage:
Insurance Times – March 2009 – Data Loss Issues
Related Images: [...]
GeneralThe Problem:
Ok, so anyone who has worked with sound equipment before would have been greatly disappointed shortly after taking the M-Audio Xponent out of the box. Essentially, it’s a bit crap. The main bug-bears are the faders, often referred to as being made by “Fisher Price”.They are loose, and generally feel nothing like a proper mixer, so anyone used to using pro audio equipment is going to feel short changed (I know I did!). That said, once you get over them, and there are some tricks you can apply to make them feel less annoying, the other primary bug-bear is Torq. This software can only be described as an epic fail! I gave it a shot, I persevered with it for a long time, and have come to the conclusion that its beat detection engine was programmed using chaos theory.
I have mixed on many different platforms, decks (belt and DD), CDJ’s (from first gen to modern) and midi software from TraktorScratch V1.0 through to the usual suspects of today. What all of these platforms allow you to do is beat match with little effort if you’ve got a good ear. Torq on the other hand, seems to want to fight this process and in my own experience, creates a clinical/harsh environment to align beats without getting nasty overlay (beat on beat cancelation). If you persevere I am sure you can personally compensate for this and actually become good at “mixing with Torq” but IMO I don’t think it appropriate to change my mixing style after 20 years just to accommodate crap software.
This problem brings us to the solution I have discovered. I don’t take credit for pulling this together, many people better than me have toiled long and hard to make this work and have done some excellent work on the subject. All I wanted to do was have a rant, show you how easy it is to make the Xponent better and then credit those who did the work.
The Solution:
Native Instruments have invested a lot of time and energy into refining the Traktor product to what it is today. I have used different iterations of it since Scratch v1.0 (the first ever version) and it just keeps improving! The most recent version is Traktor Pro V1.x, I am using 1.2.4 and it is truly phenomenal. I won’t go into it in too much detail, but will say this much, its intuitive, just like it should be, has some amazing effects available out of the box and “just works perfectly” What more could you ask for?
Of course, Despite the Xponent being a Midi Control Surface and a Sound Card, it’s been locked into Torq to proliferate the spread of the evil program, but, there is a way you can break out of this and turn your midi control surface back into a programmable 2-way midi surface like any other. It’s actually quite simple:
While you switch the device on, press and hold the number 2 Queue button + the Lock Button on the left deck. It’s that simple, hold them till it’s all booted up, and to check its worked, press any button, if it lights up then fades away, it’s not worked and you need to power off and try again. If it does not light up, you’re in business and you have a midi control surface ready to use with any Digital DJ software you want!
At this stage you have a couple of options, start mapping the buttons yourself or grab a map that has already been put together. Personally, I like to short-cut things, so I would grab a predesigned map. After a good look around and a few failed starts, I found a mapping from HolyCT based on the work of DJ Kad listed in the NI Forums. It is amazing! It has all the mappings you would want, full documentation and even a browser mode so you can use the jog wheels to browse your track lists without the keyboard and mouse! It makes use of the X/Y Pad and is IMO a very well put together map for the Xponent.
Bringing the good features from the Xponent to a well written and user friendly piece of software like Traktor Pro, is a marriage made in heaven! I am truly blown away with the usability and playability of the combination, and it has convinced me to stick with my Xponent for the time being. It may not be the best controller in its class, but it has some cool features and once you get used to the faders, it’s not all bad!
Related Images: [...]

LiveMixesWell, it’s been a long time coming, but until today, there has always been a reason not to. Recently, I managed to cobble together my old Stanton Final Scratch V1.1, and sure enough, the old girl worked a treat. So here is the result. The first mix of 2008, and although I am obviously a little rusty, its not too shabby! (Appologies to any listeners, there is a small low level hum you pick up during quiet moments due to the old laptop I am using. The next mix will have this fixed)
Enjoy!
https://jabawoki.com/wp-content/mp3/DJJD__Dirty_House__16072008.mp3
Podcast: Play in new window | Download
Related Images: [...]